Although there are pros and cons, Macs have long been considered to be the best choice for application development, and the rationale behind the opinion that Macs are better is that both iPhone and Android application development can be done on a single Mac.
However, in my favorite technical book “Android Programming for the First Time with Kotlin”, I found the following opinion about M1 Mac.
During the writing of this book, a Mac with Apple silicon (M1 CPU) was released. During the transition period to Apple silicon, we recommend that you use a Mac with an Intel CPU.
After this, various updates were implemented, and as a result, Android Studio became ARM-compatible and was included in the operating environment.
However, building a development environment for Android Studio on the M1 Mac requires some work. The two major steps are upgrading Java and installing the JDK.
In this article, we will introduce the process of building the Java and Android Studio development environment on the M1 Mac.
M1 JDK problem on Mac
However, after installing Anroid Studio and coding, you may not notice it at first glance, but when you run REPL, you will see the following error message and execution will fail.
`CommandLineWrapper` is ill-suited for launching apps on Java 9+.
If the run configuration uses “classpath file”, please change it to “@argfile”.
Otherwise, please contact support.
I asked myself, “Is the Java JDK installed on the M1 Mac? When I checked in the terminal, I got the following response.
The operation couldn’t be completed. Unable to locate a Java Runtime.
Please visit http://www.java.com for information on installing Java.
By the way…
Start a terminal on your Mac and type “Java -version”.
So, since the Open JDK called Zulu, developed by Azul and Microsoft in cooperation, is available for the M1 Mac, I downloaded it immediately.
I proceeded with the download, and when I checked the installation status of Java, the display changed to the following.
openjdk version “16.0.1” 2021-04-20
OpenJDK Runtime Environment Zulu16.30+19-CA (build 16.0.1+9)
OpenJDK 64-Bit Server VM Zulu16.30+19-CA (build 16.0.1+9, mixed mode)
Now you can see that it is recognized as Open JDK as JDK.
「org.codehaus.groovy.control.MultipleCompilationErrorsException」 How to deal with errors
However, if this is all you do, you may encounter the following error.
org.codehaus.groovy.control.MultipleCompilationErrorsException
My personal opinion is that the reason for this is that Android Studio does not recognize Zulu as a JDK.
So, I want to have Android Studio specify the JDK directly, but if I want to specify the JDK, I need to have it specify the Contents/Home folder in the Library/Java folder.
Installing Zulu16 does not create a Java folder in the Library folder.
As the title says, installing Zulu16 does not create a Java folder on the Library folder.
Installing Zulu15 will create a Java folder on the Library folder, so let’s install Zulu15 and specify it from the “Project Structure” as shown in the image below.
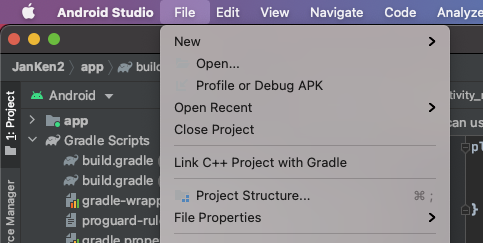
Then, specify the path to the JDK like this.

conclusion
So, to summarize this article, if you want to run Android Studio on M1 Mac, you should use Zulu15 as of this writing (July 31, 2021).
 VOICEROID+ Tomoe Minoyasu EX Download Version
I am Japanese, and my computer is set up in Japanese. So there may be some differences in the names of the buttons and windows.
I try to keep the information on this site (tamocolony) up-to-date, but please be aware that the information on this site may not be the most up-to-date, or the information itself may be incorrect. We take no responsibility for the content of this site. If you have any questions about an article or need to make corrections, please contact us via the Contact Us page.
