When you are deploying computers and printers on a large scale, the most difficult task is to replace them.
When replacing all the computers and printers at once, you basically need to use the IP address that is currently assigned, but the first thing you need to do is to gather information.
In this article, assuming the replacement of printers, I will show you how to use PowerShell to obtain information on printers in a LAN at once, and how to remotely install the drivers after the replacement.
About Windows Remote Management(WinRM)

In fact, the Group Policy Management Editor describes WinRM as follows.
This policy setting allows you to control whether requests for the HTTP transport are automatically listened for in the network by the Windows Remote Management (WinRM) service via the default HTTP port.
If this policy setting is enabled, then the network will automatically listen for requests for HTTP transports via the default HTTP port by the WinRM service.
To allow the WinRM service to receive requests over the network, define port 5985 (the default port for HTTP) as an exception in the Windows Firewall policy settings.
If this policy setting is disabled or not configured, the WinRM service will not respond to requests from remote computers, regardless of whether WinRM listeners are configured or not.
To be honest, this doesn’t make much sense to me, but to put it bluntly
To be honest, it doesn’t make much sense, but in a nutshell, it means that if you allow remote server management via WinRM, Remote Management is enabled and can be accessed via PowerShell.
That’s it.
However, if you are using an HTTPS proxy server, you will need to configure it separately.
Build an environment where WinRM can be used.

I actually want to use WinRM! This article assumes an AD environment.
This article assumes an AD environment, but even if you are not in a policy environment, don’t worry, I will show you how to allow it with commands.
Allow management by WinRM

In order to allow remote administration using WinRM, we need to set up what kind of connections should be allowed remotely when viewed from a PC.
There are different ways to do this depending on whether you have an AD server environment or not.
If you have an Active Directory (AD) environment
If you already have an AD environment, you can use group policy to distribute all the devices in the domain at once.
Let’s take a look at the specific procedure.
- Open the Group Policy Management Editor.
- Right-click on the policy set in the group you want to apply, and click [Edit].
- Select Computer Configuration: Policies ▶ Administrative Templates ▶ Windows Components ▶ Windows Remote Management (WinRM) ▶ WinRM Services, and double-click “Allow WinRM to manage remote servers”.
- Basically, this is set to “Unconfigured”, so change it to “Enabled”.
Write “*” in the options “IPv4 Filter” and “IPv6 Filter” respectively.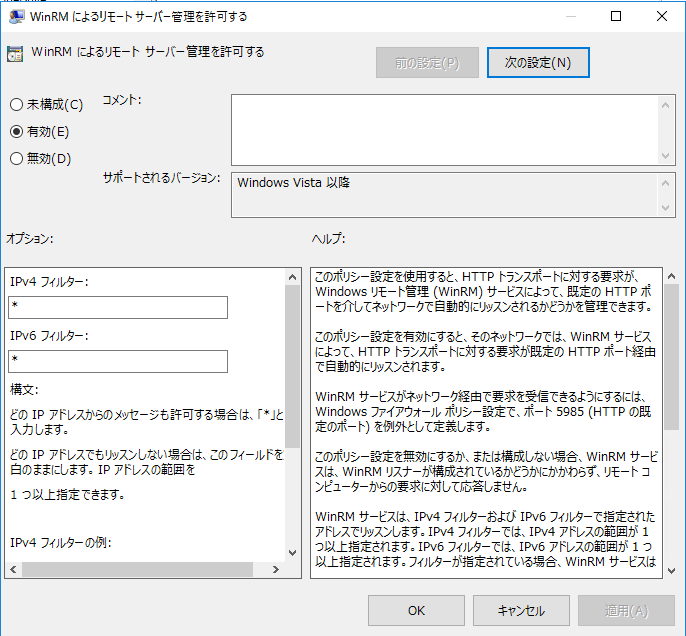
- Click the [Apply] button, and then click the [OK] button.
This operation will allow you to remotely access the terminal with the policy applied via WinRM.
You can either wait for the policy to be applied when the OS is booted, or you can force it to be applied by executing the gpupdate /force command on your PC.
If you do not have an Active Directory (AD) environment
If you have an AD environment, you can distribute all the computers at once, but if you are deploying the computers in a workgroup environment, execute the following commands on the computers you want to connect to in order using PowerShell.
# ①Allow remote operation
winrm quickconfig -force

# ②Specify the connection destination
Set-Item WSMan:\localhost\Client\TrustedHosts * -Force

# 3Script execution permission
Set-ExecutionPolicy RemoteSigned –Force
This will allow WinRM to manage the remote.
Start the WinRM service.
What we have introduced so far is only to allow remote management by WinRM.
If the WinRM service is not running on the destination computer, you will not be able to connect to it, so you should configure it to start automatically.
If you have an Active Directory (AD) environment
- Open the Group Policy Management Editor.
- Right-click the policy set for the group you want to apply, and then click “Edit”.
- Double-click “Windows Remote Manager (WS-Management)” under Computer Configuration: Policies ▶ Windows Settings ▶ Security Settings ▶ System Services.
- Check the “Define settings for this policy” checkbox, and set the startup mode to “Automatic” (see the figure below).
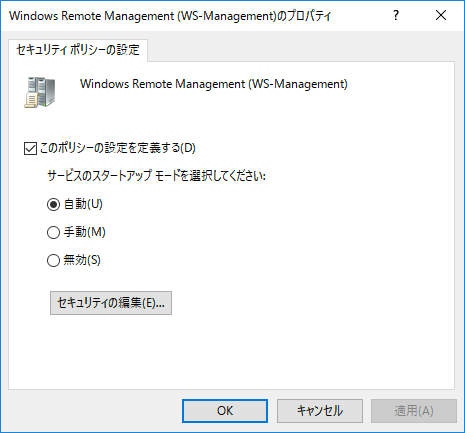
- Click the [Apply] button, and then click the [OK] button.
Now that the service is started, you can finally connect remotely via WinRM.
If you do not have an Active Directory (AD) environment
If you do not have an AD environment, you need to start the service directly on the computer you want to connect to.
If you do not have an AD environment, you will need to start the service directly on the computer you want to connect to. However, depending on your environment, you may be able to run the service remotely by connecting to “Connect to another computer” from “Computer Management”.
In that case, follow the steps below to start the service.
- Press the “Win + R” keys at the same time to open “Run”, enter “services.msc”, and click the [OK] button.
- Double-click “Windows Remote Manager (WS-Management)” and set “Startup Type” to “Automatic”.
※At this time, if you want to perform verification immediately, click the [Start] button in the “Service Status”. - Click the [Apply] button, and then click the [OK] button.
This completes the manual authorization of remote connection by WinRM.
Extracting printer information with PowerShell commands

In my case, I decided to create a simple command execution only without creating a PowerShell file in order to take over the work in the future.
The envisioned operation is as follows.
Execute the command to extract all the printer information.
All the extracted information will be saved in the “Result” folder on the desktop, with the host name of the computer as the file name.
Extract basic information about the printer
Execute the following command on the AD server if you have an AD environment, or on your own terminal if you do not have an AD environment.
Invoke-Command -ComputerName ○○○ -ScriptBlock {Get-WmiObject -Class Win32_Printer} > .\result\"result_○○○.txt"
Where ○○○ is the hostname or IP address of the computer.
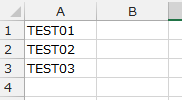
I just wanted to make it easy, so I started by listing the hostnames of the targets in Excel.
Insert the following formula in column B.
="invoke-command -computername"&" "&A2&" "&"-scriptBlock {get-wmiObject -class win32_printer} > ○○○\""result_"&A2&".txt"""
Where ○○○ is the path to the folder you want to save.
Then, the expected command will be created in column B.
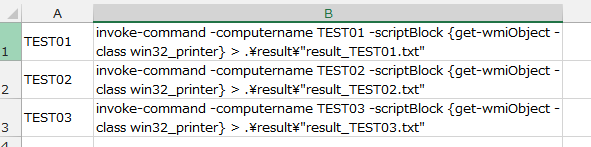
Next, copy all of column B only and paste it into PowerShell, and the commands will be executed in order from the top and the printer information will be saved one after another in any folder.
Extract the IP address of the printer
When extracting the basic information of the printer, the command was as follows, as I have introduced.
Invoke-Command -ComputerName ○○○ -ScriptBlock {Get-WmiObject -Class Win32_Printer}
If you want to extract even the IP address and other port information of the printer, execute the following command separately.
Invoke-Command -ComputerName ○○○ -ScriptBlock {Get-WmiObject -Class Win32_TcpIpPrinterPort}
Now, if you use VLookUp or something similar to attach the basic printer information you just extracted, you can extract all the printer information.
conclusion
In this article, I introduced how to use PowerShell to remotely connect to a PC via WinRM and extract the printer information set on the PC at once.
I hope you will find it useful as I was able to replace the printer smoothly.
I am Japanese, and my computer is set up in Japanese. So there may be some differences in the names of the buttons and windows.
I try to keep the information on this site (tamocolony) up-to-date, but please be aware that the information on this site may not be the most up-to-date, or the information itself may be incorrect. We take no responsibility for the content of this site. If you have any questions about an article or need to make corrections, please contact us via the Contact Us page.